


Fundamentals of Photography
- Jan 4, 2019
- 8 min read
I was asked by several visitors to the website to discuss the fundamentals of photography. This is somewhat an extensive topic ranging from exposure to composition and the lens chosen to capture any specific image. Here, I try to cover the four major areas of photography, Exposure, Composition, Lenses, and Artificial light including flash. I would leave out other topics like specialty lenses, black and white, night and low light, infrared and a few others.
Exposure:
Photography essentially means capturing light. The most critical element in photography is light. Characteristics of light, specular or diffuse, soft or harsh, and the color of light often significantly contribute to the primary impact of an image. Exposure, in essence, means controlling the light that reaches the back of the camera. Cameras are built based on the physiology of the eye. To see an object, the light emitted from that object has to reach a surface in the back of the eye called retina. To control the amount of light eye has another part called the pupil. Based on the present light pupil tries to control the amount of light reaches to the retina. On a harsh midday light, the pupil tends to constrict, and lets just small amount of light passes through, on the other hand, in a low light situation, the pupil will open up to let in as much light as possible.

Pupil of the camera. Chart of various sizes of the aperture with the corresponding numbers.
Since the camera does not have the brain to interpret the signals passed on from the eye, in addition to pupil, aperture, has to resort to two more mechanisms to control the light: shutter speed, and ISO. Both of these mechanisms will increase the camera’s ability to control even the smallest fraction of light. Shutter speed controls the time the sensor or film exposes to light; the longer shutter speed the higher amount of light and vice versa. ISO(International Organization of Standardization) determines how much the sensor or film is sensitive to light, with higher ISO more light can be registered; although it has its limitations, including creating noise or digital artifact(more on this later).
Shutter:
In a digital camera, the sensor is considerably more sensitive to light than film. With such a sensitive sensor there is no need for the shutter to stay open for a long time. Since opening and closing a mechanical ring-aperture-is somewhat tricky in a fraction of second, most cameras have replaced the round aperture with two curtains, as one opens, and moves from left to right or up to down, another curtain follows in the same direction to block the light. This mechanism also is called a mechanical shutter. In mirrorless cameras, in addition to the mechanical shutter, a different type of shutter is being used called electronic, in which sensor essentially reads the data line by line. The main advantage of electronic over mechanical shutter is the speed. Mechanical shutter seldom goes faster than 1/8000 of a second, while electronic shutter can go up to 1/32000 of a second. Another advantage is noise; they are virtually silent. Smartphone cameras only have an electronic shutter.
The shutter speeds provided by various cameras are standard, 1/15 second, to 1/30, 1/60, 1/125, 1/250, 1/500, 1/1000 and so on. Of course in the dark environment may opt for longer shutter speed, from 1 /15 second to 8th, 4th, half and 1 second. The shutter speed can be programmed up to 30 seconds. For longer than 30 seconds, the camera enters the “Bulb” phase, by pressing the shutter button, the aperture opens until the shutter pressed again when it closes. The bulb can also be programmed with remote control. By definition, for handheld photography, the longest shutter speed is one over the focal point. In the analog days since 50mm lens was commonly used, the rule of thumb was not to go longer than 1/60 seconds. These days with improved quality of lenses and an image stabilization mechanism in the lens, one can go for a bit longer shutter speed without compromise in sharpness.
There are several units for the measurement for light, LUX, Lumen, Foot and so on. In photography, the unit is called “Stop.” Adding one stop of light will double the amount of light, going from a shutter speed of 1/500 second to 1/250, or from 1/250 to 1/125; vice versa, doubling the shutter speed, from 1/500 to 1/1000 will reduce the light by one stop. To fine tune the amount light, cameras these days can be programmed to change the shutter speed by a third or half of stop. It is important to remember the above numbers are arranged in one stop interval. For the shutter speed of longer than one second, the same sequence is accurate, 1, 2, 4, 8, 15, and 30 second(s).
Aperture:
Another mechanism by which the camera controls the exposure is the aperture. Aperture is inside the lens, not the camera. Older lenses have a ring by which one can open or close the aperture; in newer lenses, the aperture can besides by camera-either front or back dial. An aperture is a number calculated in relation to the diameter of the lens and its length. It can range from 1.4 to 2.8, 4,5.6,8,11,16, and 22. The unit of measurement of the aperture is F, f 5.6, or f 11 and so on. We also should memorize these numbers as having an interval of one stop. The confusing fact about these numbers is the smaller the number is, the wider the opening and higher exposure. Aperture 1.4 lets twice as much light than 2.8, which itself is twice wider than aperture 4. So 22 is a tiny hole while 1.4 is a very large one.
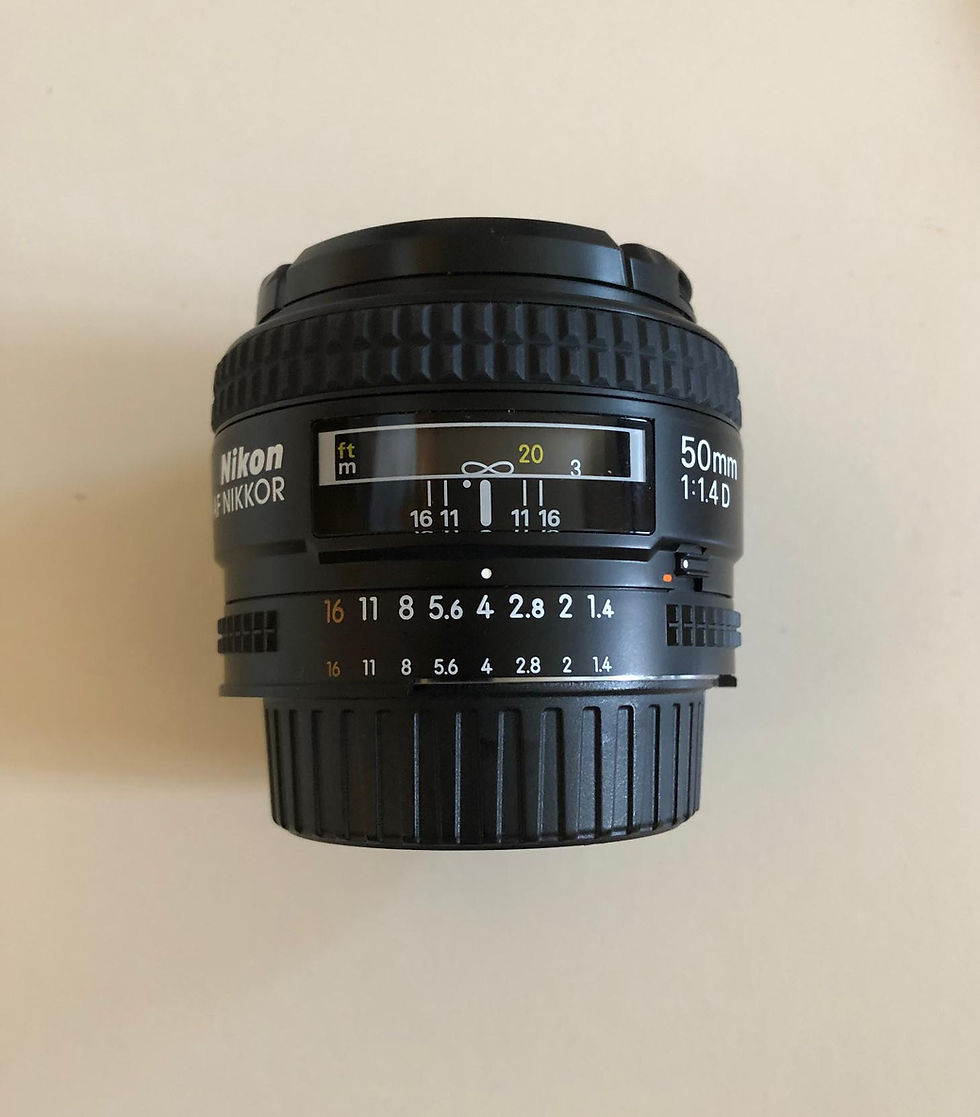
An older 50mm lens with an aperture ring to manually change the aperture.
ISO:
As mentioned above, ISO or in analog term ASA is the sensitivity of the sensor to light. The higher the ISO, the higher the exposure. Cameras typically have what is called native ISO which often is in the range of 100 to 200. Ideally one should use the native ISO. To capture an image with a digital camera, the building blocks of the sensor, pixel, registers the light emitted from the specific part of an object as an electric charge. However, since these charges are somewhat weak, cameras have an amplification mechanism called ISO. Amplifying the signals coming from a low light situation will often augment signals coming from other parts of the camera, creating a digital artifact called noise. An equivalent of noise is statics when increasing the volume of radio with weak signals. With advancing the camera technology, cameras can handle ISO up to 3200 or 6400, numbers that even 15-20 years ago was unimaginable. As an example in analog days, usual ASA for daytime photography was about 100, for night ASA 400 was widely available, but 800 had to be ordered.

A Newer lens with no aperture ring; the aperture can be adjusted eithe automatically by opting for the automatic or shutter priority mode, or using the programmed dial in front or back of the camera.

High ISO in low light situation creates a digital artifact which can be managed in post process.
Similar to the other two mechanisms ISO numbers can be sequenced with an interval of one stop.

The camera screen demonstrating the parameters, aperture of 8 with a shutter speed of 160. The front dial changes the aperture, and back dial shutter speed. It also shows the manual mode, M, raw format, white balance of sunny, with autofocus in continuous mode, and lastly, the space left on the memory card of about 1100 images.
100, 200, 400, 800, 1600, 3200, 6400, and 12500 and so on.
Below table shows the numbers of all three mechanisms with one stop interval. Note the cameras often have these numbers as 1/3rd of a stop; in shutter speed, the third of stop will be 1/60, 1/80, 1/100, 1/125, 1/160, 1/200, and 1/250 and so on. Going from 1/60 to 1/80 will increase the exposure by 1/3rd, and to 1/100 by 2/3rd.
Shutter Speed Aperture ISO
1/30 1.4 100
1/60 2.4 200
1/125 4 400
1/250 5.6 800
1/500 8 1600
1/1000 11 3200
1/2000 16 6400
1/4000 22 12500
In summary, exposure is calculated by these numbers and the relation between them. To expose the sensor properly any combination of the above parameters can be used. If the optimal exposure is at the shutter speed of 1/125, aperture of 8 and ISO of 100, the same exposure can be achieved with the shutter speed of 1/60, aperture of 11 and the same ISO. Although the exposure of these two images is the same, their composition and impact are different(more on this later). The digital cameras have various programs, called Mode, to control the exposure. From Program mode, when the camera makes all the decisions, to Manual mode when the photographer controls everything. The two other commonly found modes are Aperture priority and Shutter priority. In the former, the photographer sets the aperture, and the camera sets up other parameters; shutter priority is the other way. I do not know any situation one has to use shutter priority, but a group of even professional photographers tends to use aperture priority in a certain situation. Although manual mode may seem challenging, regular practice will ultimately enable the photographer to master the mode.
There is a light meter inside the camera measuring the amount of light in the direction of the lens. The meter tells the camera how much light is required for optimal exposure. The camera turns this information into a series of numbers, like a shutter speed of 1/250, an aperture of 8, and ISO of 100. To initiate the process, however, one has to press the shutter button halfway, which first awakens the focusing system, and then measuring the light

The Exposure Triangle, each parameter of shutter speed, aperture and ISO can influence the other two, creating the concept of reciprocity.
The numbers camera come up to let a certain amount of light passes through is called exposure value(EV). The fact that opening up the aperture enables the photographer to go for faster shutter speed or vice versa is called reciprocity. The relationship between these parameters can be demonstrated in a triangle called the exposure triangle. Having three different mechanisms to control the exposure besides the quantity of the light will provide leverage for the photographer to adjust the exposure based on the requirements of the scene being photographed. While a combination of aperture 4 and shutter speed of 250 will provide exposure of X, aperture of 8 and shutter speed of 1/60 second will have the same exposure; however, there are differences between these two exposures. An aperture of 8 compared with 4, creates more depth of field. By and large, the narrower the aperture, the longer depth of field(of course, up to a point, when closing the aperture beyond a certain number is associated with diffraction and blurred image, more on this later). The third leg of the triangle is ISO. If the above combination was achieved by ISO of 200, by going to ISO of 400, the aperture could be maintained at 8, but the shutter speed can be increased to 1/125.
As we see each of these parameters in addition to achieving a certain exposure, provides a different impact as well. Photographing a moving object demands a faster shutter speed if widest aperture does not contain the optimal exposure, increasing ISO can produce the right exposure. The downside of higher ISO is noise. Although newer cameras can manage very high ISO, the conventional wisdom is to try to minimize its value. Some cameras have a feature called floating ISO or auto ISO, which is automatically changing ISO based on EV required to capture the scene. Often the photographer can set a limit so ISO will not go above a certain number. There are extremely rare situations demanding floating ISO; overall, one should try to adjust ISO manually and avoid relying on the camera to make that decision.
I will continue the discussion of exposure in part II of the fundamentals of photography, exposure.
Comments